
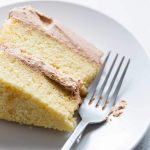
This classic yellow cake recipe is soft, buttery, and moist, with a delicate crumb, and just the right amount of sweetness. Its simple vanilla flavor is perfect for showcasing your favorite frosting or enjoying it on its own. Best of all? This cake is made entirely from scratch.

So here’s the thing about yellow cake mix, and box mixes in general.
I’m not going to fault anyone for using or even loving them.
We all like what we like, and some people really love their cake mix.
It’s chemically engineered in a food science lab to be incredibly soft and to rise perfectly every time.
Mom used it when I was a kid, and I liked it just fine (however, as a young adult I considered myself Team Pie until I started making cakes from scratch).
My grandma used it as the base for her “famous” chocolate pistachio cake.
Homemade Yellow Cake vs. Boxed Cake Mix
Last year, I decided to buy two boxes of cake mix out of curiosity. I’d been making homemade cakes for ages, and I was curious why people love box mixes so much.
To be honest, I was impressed by how idiot-proof everything was.
Homemade cake recipes have a method that typically looks something like this: creaming butter and sugar, adding eggs, then alternating between adding the dry and wet ingredients.
All of this happens at varying mixer speeds.
I dumped the cake mix and add-ins into my stand mixer, turned it on high speed, and walked away. A few minutes later, the batter was fluffy as a cloud.
Then I tasted the batter.
I also tasted the finished cake.
They didn’t taste good to me.
While I thought the texture was pleasantly soft, the flavor was cloyingly sweet; I couldn’t imagine adding more sweetness with frosting.
There was also a chemical aftertaste.
At the end of the day, it has to taste good to me. Otherwise, what’s the point?
That, my friends, is my argument for why you should make this homemade yellow cake recipe. I’m not going to preach about chemical ingredients, because I love Cool Ranch Doritos.
Cakes made from scratch taste better.
Do a side-by-side taste test comparison.
I dare you.

What’s the Difference Between Yellow and White Cake?
Yellow cake and white cake are almost identical with one exception: the eggs!
This yellow cake recipe gets its color and custardy flavor from egg yolks, whereas white cakes use only egg whites.
Also, while this isn’t always the case, white cake often uses cake flour, while yellow cakes typically use all-purpose flour.
Ingredients
For this easy homemade yellow cake, you’ll need:
- All-purpose flour
- Baking powder
- Cornstarch
- Half-and-half
- Vanilla extract
- Unsalted butter
- Granulated sugar
- Eggs

How to Make Yellow Cake From Scratch
Step 1: prep cake pans

Tip: If possible, place the cake pans on a sheet pan. This will make taking both cakes in and out of the oven much easier.
Step 2: Combine wet and dry ingredients in separate bowls

Step 3: Cream the butter and sugar

If needed, scrape down the sides of the mixing bowl to incorporate any bits of sugar or butter that don’t get whipped into the mixture.
Step 4: Add the eggs

Add the eggs, one at a time, to the butter mixture. Stop the mixer and scrape down the bowl after you’ve added in the last egg.
Tip: The yellow cake batter may look slightly curdled at this point. That’s totally normal!
Step 5: Add the wet and dry ingredients

Step 6: Beat the cake batter for 30 seconds

Step 7: Divide and bake

Step 8: Remove the cakes from the pans

Let the yellow cakes cool completely before removing them from the pans.
You’ll likely need to use a knife to release the sides of the cake before gently flipping the cake out.
You can frost this cake with any frosting you like, but I’ve made some notes in the recipe card below if you’re searching for an easy recipe.
Read more: While not essential, I think certain tools like offset spatulas and parchment rounds are very helpful. If you’d like to know more about my cake equipment recommendations, as well as general tips and tricks, check out my article: How to Make a Perfect Layer Cake.

recipe tips
Before placing the cake in the oven, make sure the tops are level (I do this with an offset spatula). This will help ensure that they bake evenly.
If the tops still bake unevenly, use a serrated bread knife to shave off some of the excess cake before frosting.
Weight the flour on a kitchen scale, or at least make sure you’re measuring it correctly. Here’s an article about why this is important: How to Measure Flour
Avoid ingredient and equipment substitutions, at least the first time you prepare a recipe. Different size eggs will change the structure of the batter.
So will different types of sugar. If you use non-dairy, skim, or whole milk instead of half-and-half, the cake will be more dense and dry.
Increasing the size of the cake pan will increase the bake time and potentially impact the structure of the cake.
For example, a 9-inch cake pan is actually 25% bigger than an 8-inch cake pan, so to get the exact same cake, you need to increase the ingredients by 25%. Learn more about this here.
Make sure your baking powder is active. Baking soda and powder expire over time, which will prevent cakes from rising.

More Cake Recipes From Scratch:
If you enjoyed this yellow cake recipe, be sure to check out my Rum Cake, Vanilla Cream Cakes, Sour Cream Coffee Cake, and Chocolate Malt Layer Cake. For even more homemade cake and cupcake recipes, be sure to visit my dessert recipe archives.
Classic Yellow Cake Recipe
Ingredients
- 7 ounces all-purpose flour (198g or 1 1/2 cups + 1 tablespoon using Spoon & Level Method)
- 2 ounces cornstarch (58g or 1/4 cup + 2 tablespoons)
- 1 1/2 teaspoons baking powder
- 1 1/2 teaspoons kosher salt
- 1 cup half-and-half (or 1/2 cup whole milk + 1/2 cup heavy cream)
- 1 1/2 tablespoons pure vanilla extract
- 6 ounces unsalted butter, cubed and at room temperature
- 12 ounces granulated sugar (341g or about 1 3/4 cup)
- 4 large eggs
Instructions
- Set a rack in the middle of the oven and preheat to 350 degrees F. Very lightly grease the bottom of two 8-inch cake pans (do not grease the sides) and then top with parchment rounds. Place the pans on a baking sheet, if possible (this will make taking both cakes in and out of the oven at once a breeze).
- In a medium bowl, thoroughly whisk together the flour, cornstarch, baking powder and salt. In a liquid measuring cup, combine the half-and-half and vanilla. Crack the eggs into a small bowl or liquid measuring cup.
- In a stand mixer fitted with the paddle attachment, combine the butter and sugar on low speed for 3 minutes, until pale and fluffy. If there are any bits of unincorporated sugar and/or butter on the sides or bottom of the bowl, use a spatula to incorporate them and mix for an additional 30 seconds.
- Slowly add the eggs, one at a time, stopping to scrape down the bowl all the way to the bottom after the second and final egg. The batter may begin to look slightly broken by the end of this step; it’s ok.
- On medium speed, swiftly alternate between adding the dry and wet ingredients, starting and ending with the dry. This shouldn’t take longer than a minute.
- Turn off the mixer and scrape down the bowl, all the way to the bottom, making sure there are no hidden dry patches. Turn the speed up to medium and mix for an additional 30 seconds to help build the structure of the batter. Do not skip this step.
- Divide the cake batter evenly into the prepared cake pans. Use an offset spatula to even out the tops (don’t skip this step or the cake may not rise evenly).
- Bake for 28-30 minutes, or until a toothpick comes out clean from the center. Cool to room temperature before removing from the pan. Use an offset spatula or knife to help release the sides of the cake from the pan, then place a cardboard round or large cutting board against the cake pan and gently flip.
- Frost with your favorite recipe! (See notes for suggestions)
Video
Notes
Regarding substitutions:
- Don't substitute different sized eggs (this includes farm eggs) without weighing them, or it will change the structure of the cake.
- The cake will work if you use dairy with a lower percentage of fat (such as whole milk instead of half-and-half), but the results will be more dry and dense.
- You will not get the same results from a 9-inch cake pan unless you increase the ingredients by 25%.
- Beginner: Sour cream chocolate frosting
- Advanced: Chocolate Italian meringue buttercream
Please read my full post for additional recipe notes, tips, and serving suggestions!
Nutrition
Recipe Troubleshooting
For immediate help troubleshooting a recipe, please email me using the form on my contact page. I’ll try to respond to urgent questions as quickly as possible! For all general questions, please leave a comment here :)


Hi! This looks delicious- do you think this could work on a 9×13 pan if I increase the recipe by 25% ? Thank you!!
Hi Simone,
I’ve never tried this, so I’m not 100% sure, and I definitely don’t want to give you incorrect information. I appreciate you asking before diving in! I’m currently doing research for an article about how to covert pan sizes, but I haven’t done enough testing on my own yet to confirm everything I’ve read. Here are a few articles that seem trustworthy, and you might be able to use them to do the conversion. Food52 article & Epicurious Article.
This is the perfect yellow cake recipe! It is a true old-fashioned homemade cake with a beautiful texture and wonderful flavor! I made it for my mother’s birthday and I will never make another kind of yellow cake. Using my kitchen scale to weigh the ingredients as Jennifer recommended gave me excellent results. I frosted the cake with Land O lakes buttercream frosting because some members of my family don’t like chocolate (crazy, I know!), but I am looking forward to trying Jennifer’s Sour Cream Chocolate Frosting the next time I bake this cake, which will probably be very soon!
Thank you for sharing your recipe and instructions. This is only my 2nd attempt at making a cake from scratch. When I was younger I used to love cake mixes but not any more. I liked the consistency of your cake and the vanilla flavor was great, but it was just too sweet. I made this cake for 9 inch pans so I increased everything by 25%, that brought the sugar up to 15 ounces. I’d like to try again but with less sugar. Any suggestions?
Hi Kathleen, thanks so much for taking the time to leave a review! I completely understand where you’re coming from, and this is something I’ve thought about quite a bit. It’s tough to accomplish since the sugar is such an important part of the structure here, and I’d need to replace with with something. Sometimes there’s an easy solution. For example, when I want to cut back on the sweetness in recipes that use powdered sugar, I can get away with replacing some of it with cornstarch (powdered sugar is sugar + cornstarch). But in this cake that would change the texture. I’m afraid I don’t have a simple solution for you, but I’m definitely working on it!
Yet another food blog with unnecessary verbiage. I shouldn’t have to scroll through 40 ads and walls of text to find a recipe equivalent to King Arthur or Pillsbury. I think you were a little excessive with monetization and it’s my pleasure to have you get charged for impressions without me getting charged a dime, lol.
Hi Jessica. May I ask what you do for a living? Do you try to earn the best income possible? And do you expect cookbooks to be free, or are you willing to pay because you understand how much work goes into them? This is my job. I think most people don’t realize how much work goes into food blogging. I test recipes multiple times, do all the photography/editing, promotion, etc. I have work related expenses on top of personal ones like my mortgage & health insurance. I work days, evenings and weekends. The difference between me and Pillsbury is that I’m a one woman show- no staff. In addition to nationally sold products, they have way more traffic than me, hence the need for less ads. My content is not about my cat- I’ve included as much info as possible to help people succeed when making the cake, since there were failures after readers didn’t understand certain basic concepts. Every time that happens, I add in a related tip.
Please keep that in mind in the future. I try to make the ads as non-invasive as possible, but we’re all just trying to earn a living here.
Brava!
Hi! Can you use this recipe for cupcakes? Thank you!
Hi Devon! You can. Each layer should make around 12 standard or 24 minis. Possibly a bit more since you only fill the muffin tins halfway regardless. I’ve made these into cupcakes several times over the years, but it has been awhile. They will take less time, so start checking for doneness at around 22 minutes.
hi, thanks for posting this recipe. I’m looking forward to trying it. I have a question.
In #5, you say to mix on medium speed.
Then, in #6, you say to turn the speed up to medium. Should this be fast instead?
Or should I start on slow on #5 and then move up to medium on #6?
Thanks!
Hi Rebecca! Sorry that’s not clear; I’ll add a clarifying statement. At the beginning of step 6, you’ll want the mixer off while you scrape down the bowl. It’s almost impossible to scrape down the mixer to the bottom with it running. So you leave the mixer on while adding the wet & dry ingredients, turn it off to scrape down the bowl, then turn it back on for an additional 30 seconds. Make sense?
I normally don’t leave comments, but this cake was sooo fabulous, I just had to. Very moist, good crumb and flavor. (I used a rectangular cake pan and it rose nicely.) I’m a ‘more frosting, the better’ type girl, and after taking a frosting-free little slice, I actually caught myself saying I would eat this happily without icing.
After trying several yellow butter cake recipes during the last 2 years, this is now my go-to. Thank you!
What a delicious cake. I loved it. Simple and easy.
Can this recipe also be used for a sheet cake? Or should we use your sheet cake recipe? I’m wondering because I like the ingredients on this one better (the sheet cake uses oil and brown sugar).
Hi Alicia! I would feel more comfortable recommending you use my sheet cake recipe, since I haven’t tested this one in a sheet pan. That doesn’t mean it wouldn’t work, but I can’t guarantee it, and there’s nothing more frustrating than wasted time and ingredients.
Wow thanks for the fast response, I wasn’t expecting that! I’m making this for a birthday at work and figured the sheet would be better than the layer because of the amount of people, so I’ll try the sheet recipe out. Thanks!
For anyone else wanting a quick link to the sheet recipe: https://www.savorysimple.net/yellow-sheet-cake-chocolate-sour-cream-frosting/
Hi Jennifer,
Just test baked your cake recipe and not sure if the layers rose enough – they each measure 1 inch high only. Followed the recipe exactly including the weighing of dry ingredients except I later realized I used only 1&1/2 tsp vanilla instead of tbsp. Also, I don’t have a KitchenAid stand mixer so the alternating dry and wet mixing took longer. Could this have made a difference? Haven’t yet frosted it but the crumbs are delicious
Hi Nancy! Hmmmm, they should definitely be higher than 1 inch, even if you used less vanilla. I’m sorry about that, but I’m glad it still tastes good! To confirm, you used 8-inch pans, large eggs, and your baking powder isn’t expired? Also, did you use an electric hand mixer or did you do all of the mixing by hand? I’m wondering if maybe the butter, sugar and eggs somehow didn’t get enough air into them. The batter is usually pretty fluffy pre-bake.
Wow – thanks for your speedy response! I used an electric hand mixer and baking powder had not expired although it’s been opened for about 6 months. Will buy again before my next attempt! How do I get more air into the butter, sugar and egg mixture? Thanks again!
Not a problem! I think most of the people who’ve run into trouble with this cake so far used a 9-inch pan instead of an 8, which is why I also asked about that. It causes the batter to spread out by 25% more than originally intended, which most people don’t expect. If your baking powder has only been open for 6 months, it should be fine, unless your grocery store doesn’t do a good job at turning it over. I have a quick test you can do here to see if it’s still active (near the bottom of the post). As for adding air into the batter, I think stand mixers do a better job than electric mixers. I use electric mixers for cookies, muffins, bars, etc, but I usually prefer my stand mixer for cakes. Regardless of the machine used, it’s about using higher speeds to aerate the ingredients. Creaming the butter and sugar is a good example. After mixing for several minutes on a higher speed, the creamed butter should be lighter in color, fluffy in texture, and larger in volume. These are the short of techniques that add extra lift to a cake.
You know how when friends stack sponges on top of each other and then cover it with icing? That’s literally how our cake tasted. We followed the instructions to the best of our abilities, but it was terrible. I’m sure yours turned out lovely, but ours was literal garbage.
I’m sorry to hear that; I know how frustrating it is to feel like you wasted time and ingredients. If you want to shoot me an email at recipehelp@savorysimple.net, maybe we can figure out what went wrong. While I realize everyone has different taste buds, I’m very confident that the cake shouldn’t taste like literal garbage.
I would love to make your yellow cake but my granddaughter is lactose intolerant. Can I use non dairy milk or half & half?
Hi Susan! You can; I would go with the higher fat content if possible to avoid drying out the cake, so use a non-dairy half & half over milk. Can she have lactose-free dairy products? I’ve been experimenting with those recently and Organic Valley makes a fantastic lactose-free half & half. If not, make sure to avoid anything sweetened since the cake is already sweet. I would also avoid anything with a flavor, such as coconut milk.
I can’t wait to try this for my husband’s birthday! If I use 9 in round pans do I also need to adjust temp and baking time? Thank you!
Hi Sara! The temperature should be the same, and the bake time should be approximately the same, though individual ovens always vary slightly.
Will this recipe work for regular size cupcakes? Also I’m making a giant smash cake cupcake. Will it work for that as well? Thanks.
Hi Carol, it will work for cupcakes. Just cut down the bake time by around 5-6 minutes. I don’t know what a giant smash cupcake is.
I made this yellow cake for my husbands birthday. Both he and his dad said it was the best cake they had ever had.
Well, that made my day :) :) :)