
Homemade corn tortillas are very easy to make, with a taste and texture better than store-bought, and they are 100 percent gluten free! Make this tortilla recipe; no press is needed!

After you make them, you’ll probably want delicious ways to fill them. My suggestions are to start with my recipes for Grilled Flank Steak Tacos and Quick and Easy Rotisserie Chicken Tacos!
Recipe Ingredients
- Masa harina (I like this brand)
- Kosher salt
- Water
What is Masa?
Masa is a corn dough that’s used for making corn tortillas, tamales, pupusas, and other Latin American dishes. It’s made from ground nixtamalized corn. It’s full name is masa de maíz and the dried and powdered form is most commonly called masa harina.
Masa harina translates to “dough flour” in Spanish, which also refers to other types of dough. {Read more on Wikipedia}
Is Masa The Same As Cornmeal?
Masa harina and cornmeal are not the same thing; they’re very different preparations of corn.
Masa harina is made from white maize flour treated with lime or wood-ash lye. It can be confusing, but for culinary purposes, you just need to know that masa harina is good for making corn tortillas, whereas cornmeal is used to make things like cornbread and polenta.
If you’d like to read more about the science behind why they’re different, I recommend checking out this article from Joe Pastry.
Equipment you’ll need for this recipe:
I originally tried preparing these with a tortilla press recommended by Cook’s Illustrated. I didn’t like it at all.
That’s when I decided to try using a rolling pin and biscuit cutter. That’s the only way I’m making them from now on!
However, if you already own a tortilla press, you can certainly use it in this recipe.
This is what you’ll need for my method:
- Wax paper
- Rolling pin
- 5-inch biscuit cutter
- Foil (what I used) or a tortilla warmer
- Large skillet (preferably stainless steel, enameled cast iron, or aluminum)
- Optional: Kitchen scale
MAKING Corn Tortillas WITHOUT A PRESS
Step 1: Combine masa, salt and water in a large bowl.


Start with a spatula, then switch to your hands when the dough becomes too thick to stir. It will feel slightly gritty.
Step 2: KNEAD DOUGH

Knead the dough for 3-5 minutes, until it feels less gritty and more smooth. When I do it, it takes about 4 minutes.
Let the dough rest for 10-30 minutes after kneading. This helps the masa absorb the water. If you are in a hurry, you can skip this step.
Step 3: PORTION THE DOUGH

I like to use a kitchen scale to portion out 1 1/4-ounce or 1 1/2-ounce balls.
If you don’t have a kitchen scale, aim for 1 1/2-inch diameter balls. The smaller the portion, the less excess dough you’ll wind up needed to re-roll (you’ll see what I mean below).
However, while re-rolling adds a bit of extra time, it will be slightly easier to roll the corn tortillas to fit inside the biscuit cutter. There’s no right or wrong way.
Step 4: ROLL OUT THE DOUGH

If you have a tortilla press you want to use, this is where you’ll want to break it out.
For my method, you’ll want to place a ball between two pieces of wax paper and roll until it’s slightly larger than the biscuit cutter (keep the cutter nearby to use as a visual guide).
You can reuse the wax paper multiple times, but if it starts getting too soft, swap it out for new pieces.
Step 5: PRESS DOUGH WITH BISCUIT CUTTER

See what I mean about not having a lot of excess dough if you weigh out 1 1/4-ounce balls?
Before using the biscuit cutter, I recommend gently peeling the wax paper away from the dough, one side at a time. This way if it’s a little stuck, you’re fixing prior to shaping.
Step 6: PEEL AWAY EXCESS DOUGH

It’s easier to peel away the excess dough while the cutter is in place. Trust me.
Collect the excess dough each time you roll, then re-roll it at the end.
Step 7: COOK THEM

At this point, you can either keep rolling the rest of the tortillas, or you can try cooking one. I found it saved me time to roll 1-2 tortillas at a time while another 1-2 were cooking (versus rolling them all out at once).
How to Cook Corn Tortillas
- Drop the raw tortilla straight onto the skillet. If it slides a bit, the dough will start to cook while shifting, creating a bit of a peeled appearance. It will still taste great, though, and is totally useable if this accidentally happens.
- Don’t let the freshly cooked tortillas dry out while you’re cooking the rest of the batch.
You can make a foil pouch to stack them as you go, closing the pouch each time to contain the steam (this is what I did). Or, use a tortilla warmer, or place a clean kitchen towel in a lidded basket or container.
Storage and Reheating Instructions
After the tortillas have cooled, store them in the refrigerator in an airtight container or resealable plastic bag for up to 3 days.
You can reheat them in the microwave for a few seconds, or wrap them in foil and place in a 300 degree F oven until warmed through.
Are Corn Tortillas Gluten-Free?
The beauty of anything made completely from corn is that you know it is 100% gluten-free.
If you look closely at the ingredient labels on store-bought tortillas, you’ll see that many of them contain flour. If you can’t consume gluten products, be very careful when purchasing them from the store.

Other Mexican and Tex-Mex Recipes
If you love this recipe, be sure to check out my recipes for Carnitas (Mexican Pulled Pork), and Mexican Tortilla Casserole.
You can also see my full archive of DIY Recipes here!
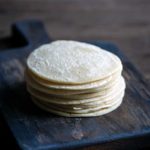
Homemade Corn Tortillas (without a Press)
Ingredients
- 2 cups masa harina (9 1/2 ounces)
- 1 teaspoon kosher or sea salt
- 1 1/2 cups warm water (see notes)
Instructions
- In a large bowl, whisk together the masa and salt. Add the warm water and stir with a spatula until evenly combined, switching to your hands once the dough gets too thick to stir. Knead for 4 minutes until the dough becomes less gritty and more smooth. Let the tortilla dough rest for 10 minutes.
- Divide the dough into 1 1/4 to 1 1/2-ounce balls (see notes). If you don’t have a kitchen scale, aim for 1 1/2-inch diameter.
- Place a dough ball between two pieces of wax paper (parchment or plastic wrap also work, but I find the dough sticks less to wax paper). Roll the dough until it’s wide enough to be cut with a 5-inch biscuit cutter. The thinner you roll the tortillas, the faster they’ll cook and the greater the yield (this may take some experimenting; you can always re-roll the dough).
- Peel the wax paper off the dough, one side at a time, then place the tortilla back down on one piece of wax paper and press down with a 5-inch biscuit cutter. Peel the excess dough away from the cutter before lifting it, then remove the raw tortilla and set aside on a cutting board or baking sheet (something you can use to move it). At this point, you can either repeat this process with the remaining dough, or roll a couple at a time while the tortillas cook.
- Heat a large skillet over medium heat (use anything but nonstick; I used stainless steel). Set down a large piece of foil or a tortilla warmer to store the finished tortillas (something to help them steam and keep warm).
- Drop a tortilla straight down onto the skillet (if it slides too much, the finished tortilla might have a peely appearance). Cook for 30-60 seconds, flip with a spatula, then cook for an additional 30-60 seconds. Times may vary depending on your cookware and the thickness of the tortillas). You can cook 1 or more at a time, depending on the size of your skillet.
- Once the tortilla is cooked, transfer to the tortilla warmer or set down on the foil and close to create a pouch. The steam will keep them from drying out. Add each cooked tortilla to the same stack, closing again as you go.
- Serve immediately (this is when they’re besor cool completely before storing in the refrigerator in an airtight container or resealable plastic bag for up to 3 days.
Notes
Please read my full post for additional recipe notes, tips, and serving suggestions!
Nutrition
Recipe Troubleshooting
For immediate help troubleshooting a recipe, please email me using the form on my contact page. I’ll try to respond to urgent questions as quickly as possible! For all general questions, please leave a comment here :)
Inspiration for this recipe
I’ve tried so many brands of corn tortillas sold at the grocery store, and I’ve yet to find one that I actually like. Most of the store brands lack a strong corn flavor, and they’re so brittle that they break in half as soon as I bite into my taco.
The best options I’ve found so far are only passable, and that’s not good enough! This is why I finally got fed up and decided to start making my own!


I can’t believe how much better these taste!
These look perfect! After trying my hand at the tortilla press, I love the idea of rolling pin + biscuit cutter!
You are right, so much better than store-bought!
I’ve made similar ‘bready’ things to this over the years and always end up finding them surprisingly easy, as you say! It’s almost faster to make your own than buying them from the shop. This recipe was no exception. It was so amazing to have homemade tortillas! Thank you!
These detailed instructions and tips are so so helpful, thank you! I’m excited to try the homemade tortillas!
These are way easier to make than I expected and will absolutely replace store-bought!
This are perfect for any recipe that needs tortillas!