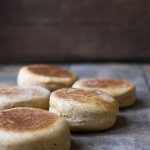
Love the smell of homemade bread? This whole wheat english muffin recipe is a fabulous breakfast or lunch option, one that’s surprisingly easy to prepare. Homemade english muffins have much more flavor than anything you’ll buy at the store, as well as a satisfying, crunchy exterior.

I don’t typically use a lot of bread products. I’m not exactly a low carb gal, but bread has always been a slippery slope for me.
Regardless of whether it’s a fresh artisan loaf from the local bakery or pre-sliced potato bread from the grocery store, if there’s bread around, I find myself eating more of it than I should.
There are two exceptions to this: sprouted ezekiel bread and english muffins. For whatever reason, I don’t feel compelled to binge on either of these.
When I have some extra time, I especially love making english muffins from scratch.

I enjoy making both regular and whole wheat english muffins. The whole wheat version has an added earthiness that I find irresistible with egg sandwiches, for some reason.
There’s just more flavor happening. I don’t use all whole wheat here, and I don’t recommend it. The results are too dense and dry.
Using a mix of all-purpose and whole wheat flour gives me exactly the results I’m seeking.
Cooking these english muffins in a skillet before baking them creates the traditional nook and cranny appearance we’re all used to, but their texture is slightly more dense than supermarket counterparts.
Feel free to play around with the ratio of whole wheat to all-purpose flour. At some point soon I plan to try creating a version of these that uses my sourdough starter instead of yeast. I think that will add even more flavor and lightness.
Baking With Yeast
This recipe uses active dry yeast. Yeast is an ingredient many novice bakers fear, and I’d like to change that! So what is yeast, and how does it work? Can you substitute one variety for another? Check out my article What is Yeast to learn more!
More Bread Recipes
If you’re looking for some other homemade bread ideas, you should check out my cheddar brioche buns and my buttery sourdough buns! I also love this Soft Whole Wheat Bread from Baking a Moment.
Whole Wheat English Muffins
Ingredients
- 10 1/4 ounces whole wheat flour (2 1/4 cups)
- 11 1/2 ounces all-purpose flour (2 1/4 cups)
- 1 1/4 teaspoons kosher salt
- 1 tablespoon granulated sugar
- 1 teaspoon baking soda
- 2 teaspoons instant yeast
- 1 3/4 cups whole milk
- 3 tablespoons unsalted butter
- 1 large egg, beaten
- semolina flour or cornmeal for dusting
Instructions
- Whisk together the flours, salt, sugar, baking soda and yeast.
- In a small saucepan, warm the milk and butter over medium heat until the butter has just melted. Let the milk cool for several minutes until it's lukewarm.
- In a stand mixer with the dough attachment, combine the milk and butter with the egg and dry ingredients and mix until the dough comes together. Allow it to mix on medium speed for an additional minute. This can also be accomplished without a stand mixer, by combining the ingredients in a bowl and then kneading the dough briefly.
- Turn the dough out onto a lightly floured surface. Roll out to approximately 3/4-inch thickness (they will puff up while cooking). Use a round cutter (approximately 3 3/4 inches) to cut the english muffins, re-rolling the dough as needed. Place the cut dough on a baking sheet dusted with semolina flour or cornmeal. Cover the baking sheet with a towel and allow the dough to rest for a minimum of 20 minutes, up to 90 minutes.
- Preheat the oven to 325 degrees F. Use a nonstick skillet on low heat to cook the muffins for 4-5 minutes per side, until crispy and brown. Finish cooking the muffins in the oven for 15 minutes.
- Before serving, fork split and toast the english muffins. These will keep for up to 2 weeks in an airtight container at room temperature, or for several months in the freezer.
Video
Notes
Please read my full post for additional recipe notes, tips, and serving suggestions!
Nutrition
Recipe Troubleshooting
For immediate help troubleshooting a recipe, please email me using the form on my contact page. I’ll try to respond to urgent questions as quickly as possible! For all general questions, please leave a comment here :)


Oh, I am so saving these to try soon! Amazing recipe, Jennifer. I love how easy these are, too. Pinned!
Those tips are very useful, I need to budget more. The fact that you are making English muffins at home is super cool!
Great job on the English muffins – they look terrific. We’ve made them before, and they’re loads of fun. We don’t often have a craving for them, so for us baking English muffins is just a sometimes thing. Our bread we do bake, all the time these days. You’re so right that you can save a bit when you start doing your own baking!
I love baking breads at home instead of buying! PLUS these english muffins just look FANTASTIC!
Hi Jennifer! I have never tried making English Muffins but it has definitely been on my list of bready things to make! Thank you for the great recipe to play with!
Blessings!
On my baking bucket list. Yours look fantastic. Pinned.
These look the way English muffins should looks. The way they sometimes look in those expensive foodie catalogs I never order from. :)
This is hardcore. I get my 8 pack of preservative-laden whole wheat English muffins for .79. Don’t think I’d save much money with these but I’m sure these are SO much better and really fun to make!
I am SO making these this week. I’ve been craving homemade English muffins all week with some fresh strawberry jam and butter.
Your photos are perfection! I love english muffins in the morning :) these look wonderful!
I must need stronger glasses I see eggs in the recipe but no where does it say when to add in the directions. Did I miss something???
Good catch, thank you! You add it to the stand mixer with the other ingredients. I’ve updated the instructions.
Do these freeze well?
I haven’t tried freezing them yet so I can’t make any promises but I don’t see why they wouldn’t! I’d go for it.
These look AMAZING! Question- do you think they freeze well? I don’t know if I could eat them all before they spoil (don’t fresh baked goods spoil faster than store-bought?) – could I bake and then wrap in plastic and freeze? Need to try this! :)
Hey Molly! You’re the second person to ask and now I really want to know as well. I haven’t tried freezing them but I don’t see why it wouldn’t work, especially if they’re wrapped well to avoid icing. I will try this with the next batch and report back!
Awww, you’re too kind to try it! Once I’m done moving, I will have to give them a spin in my new kitchen- I will try and maybe get to it first and can report back to you too :)
I made these and they freeze really well! I just pop one in the microwave for about 15 seconds before putting it in the toaster every morning and it works perfectly!
That’s so great to know, thank you!
Awesome! Thanks so much for taking the time to share, Ashley!!
I found your blog and recipe on Pinterest. I tried them this morning with a few modifications based on what I had on hand. I used 1% milk, 2 1/2 cups white flour, 2cups wheat, and a 3″ cutter. They came out wonderful! Thanks for sharing this recipe. I’d love to hear if they freeze well and if you perfect the ratio for more nooks and crannies. I’m looking forward to trying them again with a larger cutter.
I’m so glad you liked them, Dana! I will post an update once I try freezing them. I don’t see why it wouldn’t work.
What a great idea! I always thought they were difficult to make?