
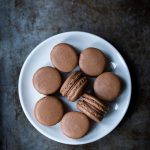
These sea salt chocolate french macarons are the perfect combination of sweet and salty! They pack rich chocolate, tangy cream cheese frosting, and briney sea salt all into one adorable little sandwich cookie.

Hey everyone! Today’s recipe is a guest post from my assistant, Sydney Jordan. Sydney has an amazing blog called About Dinner Thyme, and this girl knows how to make some amazingly good food (I speak from experience). -Jen
I first discovered sea salt chocolate macarons at a small family bakery back home in Myrtle Beach, SC– they were the epitome of the perfect dessert– a little sweet, a little salty, and a lot chocolatey. To say I was obsessed is really an understatement.
But somehow my macaron obsession wasn’t enough to keep them in business and when they closed, I decided it was time to learn how to make macarons for myself! It took some practice, but I have finally created perfect macarons: crunchy shell exterior with a light and airy filling with just the right balance of sweetness! And to ensure your success with this recipe, I’m sharing all of my previously well-kept secrets on how to make the perfect macarons!
How to Make Sea Salt Chocolate Macarons
Step 1: Sift the Dry Ingredients Together

To achieve smooth tops and ruffled feet, you’ll need to sift the almond flour, cocoa powder, and powdered sugar together. This will ensure that any large pieces are removed and it will help to mix the ingredients together.
Step 2: Whip The Egg Whites

Make sure to start with room temperature egg whites because they’ll be able to hold more air than egg whites that are cold– this is the key to achieving stiff and fluffy egg whites.
Step 3: Combine the Dry Ingredients with the Egg Whites

When you start to fold the dry ingredients into the egg whites, be patient. Folding takes time and at this point you want to retain the air in the egg whites as much as possible.
Proper folding technique is to run your spatula down the middle of the batter and scoop underneath one side and then fold it back on top of the other side. Turn the bowl 90 degrees and repeat.
Step 4: Macaronage
I know it sounds counterintuitive, but trust me… smush the batter against the side of the bowl 2-3 times, then fold it back together. Repeat the process of smushing and folding until your batter reaches the “lava stage”.
When your macaron batter is ready, you should be able to draw an 8 while the batter flows off the spatula smoothly. If the batter comes off in clumps, smush it a few more times and retry the figure 8. Next, transfer the batter to a piping bag fitted with a medium-sized circle tip. I like a Wilton #12.
Step 5: Pipe the Macarons

When you line your baking sheets with parchment, make sure the parchment paper is lying completely flat so that the macarons keep their round shape.
Word to the wise– don’t try to pipe a circle, it will inevitably turn out… not a circle. Instead, hold the piping bag straight up and down and pipe a small circle and then flick your wrist as if to draw a comma on the top of the macaron with the piping tip. Then, when you release the air bubbles, the macarons will spread and flatten into perfectly shaped circles.
Step 6: Release the Air Bubbles

It is very important to release the air bubbles from the macaron shells before they form a skin. Immediately after you’ve piped the tray, drop it on the counter a few times. Try to drop it as level as possible so the macarons stay a circle.
If you see a large air bubble that has not been released, you can gently poke it with a toothpick, then drop the tray again once or twice to fill in the gap. If you macarons have small points on the top, lightly wet your finger and press down on them until they are flat.
Step 7: Let the Macarons Form a Skin
Macarons must sit at room temperature before they are baked so they can dry slightly. You’ll know the macarons are ready to bake when they form a “skin” and are no longer sticky to the touch. This usually takes around 20-30 minutes but can take up to two hours if it’s raining or very humid outside.
Step 8: Bake the Macarons

I bake my macarons at a lower temperature than other bakers– I find that it helps prevent hollows and allows for perfectly risen feet. So, bake the macarons at 285 degrees for 18-20 minutes or until the macarons lift off the parchment paper.
If your oven cooks unevenly, you’ll need to turn the pan 180 degrees after 9 minutes of baking. This will ensure that both sides of the macaron cook evenly and one side doesn’t become taller than the other. Let the macarons cool fully before removing from the pan.
Step 9: Fill and Age the Macarons
To fill the macarons, pipe small circles of icing onto the center of one shell, sprinkle it with sea salt, and place another shell on top. Lastly, place the macarons in the fridge to age overnight. The liquid in the cream cheese icing will soften the cookie slightly and create a perfectly crisp and soft macaron. If you eat a macaron on day one, they’re usually crisp and tend to fall apart. But, the fact that macarons have to age makes them the perfect make-ahead dinner party dessert, right?!
Recipes Notes
If you’re unsure on how to properly measure your ingredients, check out Jen’s tutorial on How to Measure Flour Correctly.

Other Recipes You Might Like
Looking for more French Macaron recipes? Check out my Cookie Butter Macarons and Strawberry Cheesecake Macarons! Or if you’re looking for something else with chocolate and sea salt, check out Jen’s Chocolate Tart with Toasted Coconut and Sea Salt.
Sea Salt Chocolate Macarons
Ingredients
For the Macaron Shells
- 2 large egg whites (at room temperature)
- 1 cup plus 1 tablespoon powdered sugar
- 3/4 cup almond flour
- 2 tablespoons cocoa powder
- 1/8 teaspoon cream of tartar
- 1/4 cup granulated sugar
For the Cream Cheese Frosting
- 4 ounces cream cheese, room temperature
- 2 tablespoons unsalted butter, room temperature
- 2 tablespoons heavy cream
- 1 teaspoon pure vanilla extract
- 2 cups powdered sugar
- 3 tablespoons unsweetened cocoa powder
- 1/2 teaspoon espresso powder (optional)
Instructions
Prepare The Cookies
- Line two sheet pans with parchment paper. Make sure the paper lays flat or your macarons won’t be perfect circles.
- Sift together the powdered sugar, almond flour, and cocoa powder. Discard any large lumps that remain in the sifter. If you don’t have a sifter, you can pulse them in the food processor for 10-15 seconds.
- In the bowl of a stand mixer, beat the egg whites on medium-low speed until they are foamy and white. Add the cream of tartar.
- With the mixer on medium-high, slowly add in the granulated sugar. I like to add about one tablespoon every 5 seconds. Whip the egg whites on medium-high speed until they form stiff peaks.
- Add half of the dry mixture to the egg whites and fold it gently until the dry mixture is incorporated. Add the remaining half of the dry mixture and continue to gently fold until the batter is uniform and no more lumps remain. This should take about 15-20 folds per addition.
- This part is counterintuitive, but trust me… you have to deflate the egg whites until you get the batter to the “lava stage”. Smush the batter along the sides of the bowl in a circular motion and then scrape the sides of the bowl and fold the batter back together.
- Once the batter reaches the “lava stage” you should be able to draw an 8 with the batter and it should reincorporate within 10-15 seconds. If the batter doesn’t reincorporate, give it a few more folds and try the figure 8 again.
- Transfer the meringue to a piping bag fitted with a round tip (I like Wilton #12). If you don’t have a piping bag, you can also use a large ziploc bag with the end cut off.
- Pipe 1” circles on the parchment lined baking sheet. Make sure to pipe them at least 2 inches apart.
- Immediately after piping one tray, hold it approximately 6 inches off the counter and drop it straight down onto the counter. Repeat 10 times.
- Continue piping the second tray and drop it on the counter 10 times as well.
- Preheat the oven to 285 degrees F.
- Let the macarons sit at room temperature for at least 20 minutes, or until they develop a skin. After 20 minutes, you should be able to touch the macarons without them sticking your finger. If they are still sticky, let them sit another 20 minutes.
- Bake the macarons on the middle shelf, one tray at a time, for 18-20 minutes. You’ll know when your macarons are finished because they’ll slide easily off the parchment-- if they stick, they aren’t ready.
- Remove the macarons from the oven and let them cool on the tray.
Prepare the Cream Cheese Frosting
- Whisk together the softened butter and cream cheese until fully incorporated.
- Next, whisk in the vanilla and heavy cream followed by the powdered sugar, cocoa powder, and instant espresso powder.
- The icing should be thick enough to pipe. If it’s too thin, add more powdered sugar ¼ cup at a time.
Assembly
- Once the macarons have cooled, place them in similar sized pairs. On one side, pipe a small circle of icing in the center of the shell. Sprinkle the icing with sea salt. Place the top shell on and refrigerate in an air-tight container overnight to age. Bring to room temperature before serving.
Please read my full post for additional recipe notes, tips, and serving suggestions!
Nutrition
Recipe Troubleshooting
For immediate help troubleshooting a recipe, please email me using the form on my contact page. I’ll try to respond to urgent questions as quickly as possible! For all general questions, please leave a comment here :)


5 STARS!!! These macarons were delicious!
Now is the perfect time to learn how to make these! Your step by step will make my dreams come true and have delicious, homemade macarons in no time! Thank you!