
Learn how to make sourdough starter from scratch with this easy tutorial including step-by-step photos! You’ll be making sourdough bread in no time.

It seems like everyone is on a sourdough kick lately, doesn’t it? Unfortunately, not everyone is lucky enough to have a sourdough starter passed down to them that’s ready for baking. Fortunately, sourdough starters are super easy to make from scratch! All you need is flour and water (and maybe a bit of patience).
What is Sourdough Starter?
Before diving in, let’s take a quick look at exactly what sourdough starter is. Basically, it’s cultivated wild yeast. While most bread recipes you’ll see use active dry yeast or instant yeast, wild yeast is the stuff that was used to bake bread back in the day before we had commercial yeast to make things easier. Wild yeast is floating around in the air everywhere (it’s even in flour), and starter captures it so we can use it for baking.
Wild yeast can be more finicky than commercial yeast, but the flavors and textures you get from sourdough bread make it worth the effort.
It’s important to know that sourdough starter needs to be regularly fed with flour and water to keep it alive and healthy, which we’ll cover in more detail below.
Fun fact: wild yeast will adapt to its environment, so if someone in your neighborhood offers you a “fancy” starter that originated in a San Francisco bakery but has since been relocated, it no longer has anything to do with San Francisco. It’s the same as a starter that was created in your neighborhood. Sorry, owners of fancy starter!
How To Make Sourdough Starter
You can use any flour to make a starter – whole wheat, rye, bread, all-purpose, etc. All-purpose flour tends to be the most predictable, so that’s what I recommend starting with if you’re new to this process. Once your starter is active and healthy, you can begin experimenting with feeding it different types of flour (I personally like adding in rye and whole wheat).
This process takes 5 days (sometimes longer) but involves very little actual work. Maybe 5 minutes per day. You’ll need a digital scale and a large enough container to hold the starter (I recommend something that’s around 1 quart, such as this jar or a large deli cup).
Day 1:
Weigh out 4 ounces (113 grams) of all-purpose flour into your container. If you don’t have a kitchen scale, you can measure out 3/4 cup plus 2 tablespoons.

Next, add an equal amount of water (4 fluid ounces / 1/2 cup).

Stir the mixture together until it’s very smooth, scraping down the sides of the container. I like using a chopstick to stir.

Cover the container with a paper towel or plastic wrap and use a rubber band to secure the top in place. If you’d prefer to use the actual top that comes with the container, leave it just the slightest bit ajar so it’s not airtight. Let the container sit at room temperature for 24 hours.
Day 2
You may or may not see some bubbles starting to form on the second day. If you see them, that means the yeast is present. If not, don’t worry, they’ll get there. The starter should smell fresh, slightly sweet, and perhaps a bit yeasty.
Add an additional 4 ounces of flour and 4 ounces of water (I’m going to skip the gram and cup measurements moving forward. It’s the exact same amount). Stir vigorously until the mixture is smooth (it will look like a thick, sticky dough), then cover and set aside at room temperature for 24 hours.
Day 3
By now, you’re hopefully starting to see some activity. If not, don’t worry and keep going. But be on the lookout for smaller and larger bubbles along with a slightly sour, yeasty smell.
Weigh out an additional 4 ounces of flour and water, stir vigorously, cover, and set aside for 24 hours.

Day 4
By now, you should be seeing activity. The starter might have even doubled in size since you last fed it! (This is why I recommend a large jar). The starter might also be thinner in texture, which means it’s hungry. It should have plenty of bubbles and smell very pungent and sour. You can try tasting it.

This is where I like to mention that if at any point the starter develops a rancid smell, toss it and start over. The sour smell should always be a good type of sour- slightly vinegary and yeasty. It should never smell bad. You will know if your starter goes bad (trust me). It’s unlikely to happen if you follow the steps here, but it does happen. It has happened to me a couple times now, and you just need to start over.
Weigh out the 4 ounces of flour and water, stirring them into the starter until smooth. Once again, cover the container and set aside for 24 hours.
Day 5
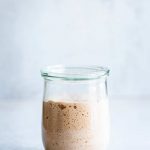
Your starter should have doubled in size if it’s active. If you look on the side of the jar, you’ll be able to see the air bubbles which are giving the starter its rise.
By now, your starter should be ready for baking. Huzzah! If you’re still not seeing a lot of activity, don’t worry. Keep up with the feedings and you’ll get there in another day or two.
What you want to start doing now is discarding some of the starter instead of continuing to bulk it up. The “discard” is what’s used to bake bread while the rest is fed and saved for future baking. It can also be used it a variety of non-bread recipes; I’ll link a few of those below.
How to Feed Your Starter
If the starter is left at room temperature, you’ll need to feed it every day (some even recommend twice per day). If you place it in the refrigerator, you can feed it once per week. There are also ways to dry it out for long term storage, but I’m not going to cover that here.
For daily or weekly feedings, measure out 4 ounces of starter, 4 ounces of flour, and 4 ounces of water. Stir the ingredients together vigorously until smooth, then cover and leave at room temperature or refrigerate. Discard the remaining starter or use it in a recipe.

Sourdough Recipes
- Sarah’s Table Loaf – Food52
- Cinnamon Raisin Sourdough Bread – Baked
- No Knead Sourdough Bread for Beginners – Joshua Weissman (this is a YouTube video)
Discard Recipes
Here are a ton of discard recipes from King Arthur Flour
More Ingredient Tutorials
- How to Roast Butternut Squash
- What Is Half-and-Half and How to Make It
- How to Make Balsamic Reduction
You can also check out my full archive of tutorials!
How to Make Sourdough Starter
Ingredients
- 4 ounces all-purpose flour
- 4 ounces room temperature water
Instructions
Day 1
- Weigh out 4 ounces (113 grams) of all-purpose flour into a quart-sized container. If you don't have a kitchen scale, you can measure out 3/4 cup plus 2 tablespoons. Next, add an equal amount of water (4 fluid ounces / 113 grams / 1/2 cup). Vigorously stir the mixture together until it's very smooth, scraping down the sides of the container.
- Cover the container with a paper towel or plastic wrap and use a rubber band to secure the top in place. If you'd prefer to use the actual top that comes with the container, leave it just slightly ajar or open so it's not airtight. Let the container sit at room temperature for 24 hours.
Day 2
- You may or may not see some bubbles starting to form on the second day. If you see them, that means the yeast is present. If not, don't worry, they'll get there. The starter should smell fresh, slightly sweet, and perhaps a bit yeasty.
- Add an additional 4 ounces of flour and 4 ounces of water to the starter. Stir the mixture together until it's very smooth, scraping down the sides of the container.
- Cover the container with a paper towel or plastic wrap and use a rubber band to secure the top in place. Let the container sit at room temperature for 24 hours.
Day 3
- By now, you're hopefully starting to see some activity. If not, don't worry and keep going. But be on the lookout for smaller and larger bubbles along with a slightly sour, yeasty smell.
- Add an additional 4 ounces of flour and water, stir vigorously, cover, and set aside for 24 hours.
Day 4
- By now, you should be seeing some activity. The starter might have even doubled in size since you last fed it! (This is why I recommend a large jar). The starter might also be thinner in texture, which means it's hungry. It should have plenty of bubbles and smell very pungent and sour. You can try tasting it.
- Weigh out the 4 ounces of flour and water, stirring them into the starter until smooth. Once again, cover the container and set aside for 24 hours.
Day 5
- Your starter should have doubled in size if it's active. If you look on the side of the jar, you'll be able to see the air bubbles which are giving the starter its rise. It's pretty cool.
- By now, your starter should be ready to bake with. If you're still not seeing a lot of activity, don't worry. Keep up with the feedings and you'll get there in another day or two.
- What you want to start doing now is discarding some of the starter instead of continuing to bulk it up. The "discard" is what's used to make bread while the rest is fed and saved for future baking.
Feeding Your Starter
- If the starter is left at room temperature, you'll need to feed it every day. If you place it in the refrigerator, you can feed it once per week. There are also ways to dry it out for long term storage, but I'm not going to cover that here.
- For daily or weekly feedings, measure out 4 ounces of starter, 4 ounces of flour, and 4 ounces of water. Stir the ingredients together vigorously until smooth, then cover and leave at room temperature or refrigerate. Discard the remaining starter or use it in a recipe.
Notes
Please read my full post for additional recipe notes, tips, and serving suggestions!
Nutrition
Recipe Troubleshooting
For immediate help troubleshooting a recipe, please email me using the form on my contact page. I’ll try to respond to urgent questions as quickly as possible! For all general questions, please leave a comment here :)


Thanks for the detailed post on making sourdough starter! I plan to get “started” on this once I have a reliable supply of flour again!
This looks so amazing and so detailed! I know I’m going to do this someday. I actually enjoy recipes that take time like this one, although it’s mostly passive time. But I find the reward so much better when you have to wait for it.
Thanks for the detailed info. I’ve been so intimidated to try this – but after not getting yeast at the store and seeing people in IG try their sourdough starter, I think this recipe is just what I needed. Thanks especially for the step by step instructions. Excited to make this.
I love this recipe! I’ve been making my own for awhile now and I love it. This recipe made it so easy and helpful. Thank you!