Homemade tofu is not the easiest thing to make from scratch, and it tastes similar to what you’ll purchase at the store. However, if you’re like me, sometimes it’s simply fun to experiment. If you want to learn how to make tofu, I’ve got you covered.

“How many dummies does it take to make homemade tofu?
Apparently three, and there are only two of us.”
-me

I’m a complete kitchen nerd and I love experimenting with this kind of thing. I think everyone should try making homemade yogurt, for example. It’s easy, it doesn’t require special equipment, and the final product tastes better that anything from the store. Unfortunately, homemade tofu isn’t quite as simple.

It’s what I like to call a labor of love. You need to purchase a homemade tofu press as well as a soy milk coagulator known as liquid nigari (I purchased this all-inclusive kit). There are many detailed steps in the recipe. It’s not a quick or hands-off process. And the final results? Well, it tastes pretty much exactly like the tofu you buy in the grocery store.
There’s definitely an art to this, because I have tasted some SERIOUSLY AMAZING homemade tofu at Japanese restaurants. That’s not a skill one can master quickly, and I’m not planning on learning to make epic tofu.

I made the recipe twice; once with my friend Shannon and again the following week by myself. As we finished, Shannon looked at the spongy block and said “that was an awful lot of work for this amount of tofu.” The next day while I was trying it again I accidentally let the mixture boil over. I don’t think we’re ever getting all of the soy gunk out of our oven door before we decide to sell the house. The kitchen is still a mess as I type.
Am I glad I tried this? Yes! Will I be making it regularly? No. If you love tofu, it’s definitely a fun experiment. Try not to let it boil over like I did.

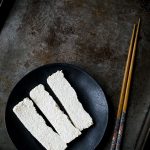
Homemade Tofu
Ingredients
- 8 ounces 1 1/4 cups dried soybeans (I used Bob's Red Mill)
- 9 1/2 cups filtered water, plus more for soaking beans
- 2 teaspoons liquid nigari
Instructions
- Place beans in a large bowl and add enough water to cover by 2 inches. Soak until beans are pale yellow and split apart when rubbed between fingertips, 12 to 18 hours.
- Drain and rinse beans (you should have about 3 cups of beans). Working in batches, process 1 cup soaked soybeans with 3 cups water in a blender until mostly smooth, about 3 minutes. Transfer mixture to a large dutch oven and repeat twice with the remaining 2 cups of beans and 6 cups of water.
- Line a colander with butter muslin or a triple layer of cheesecloth and set over a large bowl. Bring soy mixture to a boil over medium-high heat, stirring frequently with a rubber spatula to prevent scorching and boiling over. Reduce heat to medium-low and simmer, stirring frequently, until slightly thickened, about 10 minutes.
- Pour soybean mixture into prepared colander to strain. Carefully pull edges of muslin together to form a pouch and twist edges of muslin together. Using tongs, firmly squeeze soybean pulp to extract as much liquid as possible. You should have about 8 cups of soy milk; discard soybean pulp or reserve for another use. Transfer soy milk back to clean dutch oven and bring to a boil over medium-high heat, stirring occasionally to prevent scorching. Remove pot from heat.
- Combine remaining 1/2 cup water and nigari in a measuring cup. Begin stirring soy milk in a fast, figure-eight motion with a rubber spatula. While still stirring, add 1/4 cup prepared nigari mixture. Stop stirring and wait until the soy milk stops moving. Cover the pot and let it sit undisturbed for 2 minutes. Uncover, add remaining nigari mixture and gently stir in a figure-eight motion 6 more times. Cover the pot and let it sit until curds form, around 20 minutes.
- Line tofu mold with butter muslin or a triple layer of cheesecloth and place it in a large colander or baking dish. Using a slotted spoon or small fine mesh strainer, gently transfer soy milk curds to the prepared mold. Cover the top of the curds with excess muslin and the top of the tofu press. Place a 2 pound weight (or similar) on top to assist with pressing. Press tofu until desired firmness is reached. 20 minutes for soft, 30 minutes for medium, 50 minutes for firm (you can also leave it for longer; I let mine press for over 2 hours).
- Carefully remove tofu from mold and place in a baking dish. Fill with cold water to cover and let sit until tofu is slightly firmer, about 10 minutes. Tofu can be refrigerated in an airtight container for up to 1 week; change water daily.
Notes
Please read my full post for additional recipe notes, tips, and serving suggestions!
Nutrition
Recipe Troubleshooting
For immediate help troubleshooting a recipe, please email me using the form on my contact page. I’ll try to respond to urgent questions as quickly as possible! For all general questions, please leave a comment here :)


Wow!! This is insanely incredible!!! I am so impressed that you figured out homemade tofu!!! Pinning. :) You’re amazing.
I am impressed! Yeah, it didn’t go as planned and it wasn’t a gain in the end, but what a thing to check off the bucket list!
Y’know, maybe you should just have read Les Mis or War and Peace — or climb Kilamanjaro. But hey, you did – congrats! (And very fun …)
Is it weird that when I read this I thought to myself “Oh, Jennifer needs to make the Wet Cured Ham from the the Ginger Pig cookbook? She would be brave enough to do that!” I consider myself a kitchen nerd too, but this is awesomness that you went and did this.
So, so true Jenn – it’s a very messy process and so much work for not a lot of tofu. I literally never did get all of gunk cleaned up from mine boiling over. A year later we had to replace that stove – not because of the tofu – and I was not sorry to see the last of that one spot down the side of a burner that I just could not get. It was fun because I did it with friends and we kind of made the whole into a party – if parties were messy and somewhat tedious. Still glad I tried it though – just so I can say I did. :)
oh my gawd!!! you made TOFU!!! Wow, I am in awe. this is awesome.
It’s not easy to make tofu photogenic, you pulled it off brilliantly.
Love your honesty too. :)
Yeah, I never would’ve had the patience for this, but hey, it’s cool to say you did it at least?!
I love your honesty. Really. I’m totally impressed that, not only did you make it once and realize how difficult it was, then to turn around and make it again? You, my friend, are a dedicated kitchen nerd! <3 You still managed to make the whole thing look gorgeous!
I commend you for this!
That’s pretty cool. It might be hard but it’s obscure enough for me to be tempted to try! I’m a sucker for punishment.
I’ve been wanting to try tofu for a long time! This looks so good!
I love your disclaimer on this; you probably shouldn’t make this but I am going to write about it anyways, I appreciate your candidness!
I love tofu! I never realized how easy it was to make. This is an awesome find, thanks for sharing!
I have to try this out! Love tofu so much – well done you for making it :)