
I’ve been off of refined sugars and carbs for about 9 days and I have to say I’m surprised at how sluggish I still feel. Well, I’m surprised and not surprised at the same time.
Sugar is powerful stuff and it’s not shocking that it’s making a powerful statement as it works its way out of my body.
Staying away from sugar has caused me to get a bit more creative with my recipes recently. I’m still doing quite a bit of experimenting from one of my favorite cookbooks, The America’s Test Kitchen DIY Cookbook.
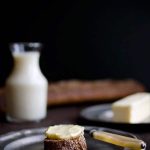
Over the past few weeks I’ve been experimenting with homemade cultured butter. I always find it fascinating to make store bought staples at home and butter was no exception.

How to make homemade cultured butter
This homemade cultured butter only has two ingredients, cream and yogurt. And it makes a butter that tastes equally as smooth and rich as anything I’ve ever bought from the store.
It does have several involved steps but none of them are difficult and the results are just plain fun. There is something so immensely satisfying about holding a lumpy stick of butter in the air and proclaiming to the stars, “I made this!” Or maybe that’s just me…

Also, buttermilk. One of the byproducts from making homemade cultured butter is real, old fashioned buttermilk like grandma used to make on the farm.
Not the curdled stuff you can make by adding vinegar to milk and letting it sit. Most likely not even the stuff you buy at the grocery store.
Real buttermilk is a byproduct of butter creation. It’s liquid gold in your baked goods.

A very important note about the recipe: one of the final steps involves pressing and washing the butter in ice water to remove any traces of buttermilk. If you don’t wash the butter very thoroughly it has the potential to go rancid quickly.
This happened to me the first time I experimented with making homemade butter. I rushed through the process and my gorgeous stick of butter began smelling sour after a week.
If you wash the butter thoroughly it will last in the refrigerator up to a month or in the freezer for four months.

Homemade Cultured Butter
Ingredients
- 4 cups pasteurized heavy cream (not ultra-pasteurized or UHT), room temperature
- 1/2 cup plain whole-milk yogurt, room temperature
- 1/4 teaspoon sea salt or kosher salt, optional
Instructions
- Combine cream and yogurt in a 2-quart jar or container with a tight-fitting lid, cover, and shake to combine. Remove lid, cover with a clean kitchen towel, butter muslin or triple layer of cheesecloth, securing in place with a rubber band. Place jar in a warm place, preferably 75 degrees F, and let sit until thickened to the consistency of yogurt, 18 to 48 hours. (If temperature dips much below 75 degrees, culture may take up to 60 hours). Once thickened, remove the kitchen towel, cover jar with lid, and transfer to refrigerator until mixture registers 60 degrees F, about 2 hours.
- Place 4 cups of ice water in the refrigerator. Line a fine-mesh strainer with a butter muslin or triple layer of cheesecloth and set it over a large bowl. Using a stand mixer fitted with the whisk attachment and covered with plastic wrap, whip cream on high speed until cream separates into buttermilk and small clumps of yellow butter, 2 to 5 minutes. Strain butter through prepared strainer for 1 minute. Gather edges of muslin and twist to squeeze butter until buttermilk no longer flows freely from pouch. Remove butter from muslin and transfer to a clean, large bowl; reserve buttermilk for another use.
- Pour about 1/3 cup ice water over the butter. With butter resting in water, use rubber spatula to fold the butter against the side of the bowl, letting water wash over the butter to rinse off any remaining buttermilk. Discard milky liquid, and repeat washing process until water remains clear, about 6 washes. After the final wash, discard any water in the bowl and continue folding butter to squeeze out any remaining liquid; discard liquid. If you want to really get in there, squeeze the butter with your hands at the end. Sprinkle butter with salt, if using, and fold into butter. Divide the butter in half, transfer to parchment paper, and roll into 2 logs or desired shape. Butter can be refrigerated for up to 1 month for frozen for at least 4 months.
Notes
Please read my full post for additional recipe notes, tips, and serving suggestions!
Nutrition
Recipe Troubleshooting
For immediate help troubleshooting a recipe, please email me using the form on my contact page. I’ll try to respond to urgent questions as quickly as possible! For all general questions, please leave a comment here :)


I am so excited to try this. Honestly, I haven’t been this excited about a recipe in ages. Going to stock up on cream this weekend and give it a go. I love butter, my husband was raised on skim milk and margarine and I was raised on full fat dairy all the time, I think I’ve converted him now. Good quality butter is something I can’t leave alone and it doesn’t last long. I’ve been wanting to try some “hand-made cultured butter” which is available from my local gourmet store but they charge $10 for 250g (8.80z) so I might just give it a go myself!
I’ve made butter before by just whipping cream (no yogurt) in a mixer for a while. What is the benefit of adding the yogurt to make it cultured butter? Does it behave differently in baked goods or in any other preparation?
Slightly different taste and a longer shelf life.
I am gradually moving to homemade staples and cannot wait to try this.
your butter looks fabulous. I must try making my own.
Can’t wait to try this recipe
Gave this a try and served it at Mother’s Day brunch. That was my test-run. I’m going into my daughter’s school (preschool) this week to make butter with them. We’re going to use the buttermilk to make scones and then they’ll have buttered scones for an after nap snack.
I love to help kids learn where their food comes from and this is a great one they probably wouldn’t know otherwise.
Do you make your own yogurt? I do it’s better than anything store bought and east to make. I’m going to make this with my homemade yogurt. Thanks for the recipe.