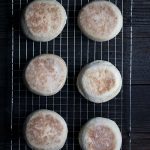
These English Muffins are easy to prepare, and taste better (in my opinion) than what you’ll buy at the store. The texture is slightly different, but you get the same “nooks and crannies” effect. I use this english muffin recipe constantly, whether it’s for a sandwich or a quick pizza fix. They freeze well, so I always have some ready to go.

A few years ago, I first shared a recipe for whole wheat english muffins, and those are still a staple around here. I love the way whole wheat adds a subtle, earthy flavor.
I’ve made a few minor tweaks to the recipe over time with repeated tests, and also taking into account reader questions and comments.

I am frequently asked about how to make regular english muffins, and since the flour is not a 1:1 conversion, I figured it was time to share a new post that covers my version of the classic recipe.
I get a lot of the same questions and comments on the whole wheat version, so I’m going to attempt to address these issues immediately.

Why don’t these have the same taste/texture as store-bought english muffins?
The big brands use a variety of preservatives and interesting ingredients that don’t involve the standard flour, yeast, salt, butter, etc. I’m sure I could start experimenting with some of them, but you’re not really going to want to go out and buy weird additives, are you?
Those english muffins also stay “fresh” in my refrigerator for so long it’s creepy. These might not bake up perfectly round or flat, either. That’s ok.
Homemade breads aren’t supposed to look perfect. As long as you enjoy how they taste, that’s all that matters.
Why didn’t my english muffins rise?
If your english muffins seem overly dense and/or like they didn’t rise at all, there are four possible causes:
- The milk/butter mixture was too hot and killed the yeast
- The yeast was too old when you started (check your expiration dates)
- Your baking soda has expired (check your expiration dates or do a vinegar test)
- You didn’t let the dough rest long enough. I don’t mind the 20 minute rest, but the results are more dense than if you give them at least 60 minutes or longer. Keep in mind that even after 20 minutes, they should still puff up on the skillet.
Tip: Do not add hot liquid directly to yeast.
Baking With Yeast
This recipe uses active dry yeast. Yeast is an ingredient many novice bakers fear, and I’d like to change that! So what is yeast, and how does it work? Can you substitute one variety for another? Check out my article What is Yeast to learn more!
Anyway, I hope you love these as much as I do! Do I have any sourdough fans out there?
At some point, I’m hoping to try using my starter to create a sourdough version of these. Let me know if that’s something you’d like me to share on the blog!

To see how I make these, you can check out the video for my whole wheat english muffins, which follows the exact same process:
Homemade English Muffins
Ingredients
- 22 1/2 ounces all-purpose flour (approximately 5 cups)
- 1 tablespoon granulated sugar
- 1 1/4 teaspoons kosher salt
- 2 teaspoons instant yeast
- 1 teaspoon baking soda
- 1 3/4 cups whole milk
- 3 tablespoons unsalted butter
- 1 large egg, beaten
- semolina flour for dusting
Instructions
- In a medium-sized bowl, whisk together the flour, sugar, salt, yeast, and baking soda.
- In a small saucepan, warm the milk and butter over medium heat until the butter has just melted. Let the milk cool for several minutes until it's lukewarm.
- Place the dry ingredients in a stand mixer fitted with the dough attachment, and turn on low speed. Add the milk and butter along with the egg, mixing until the dough comes together. Allow it to mix on medium speed for an additional minute. (Note: This can also be accomplished without a stand mixer, by combining the ingredients in a large bowl using a spatula, and then kneading the dough until it comes together).
- Turn the dough out onto a lightly floured surface. Roll out to around 3/4-inch thickness (they will puff up quite a bit while cooking). Use a 3-3/4 inch cutter to cut the dough, re-rolling as needed. Place the cut dough on a baking sheet dusted with semolina flour or cornmeal. Cover the baking sheet loosely with a towel and allow the dough to rest for a minimum of 20 minutes, up to 90 minutes. The less time these rest, the more dense they will be.
- Preheat the oven to 325 degrees F. Use a nonstick skillet on low heat to cook the muffins for 4-5 minutes per side, until lightly crispy and brown on the exterior. Finish cooking the muffins in the oven for 15 minutes.
- Before serving, fork split and toast the english muffins.
Notes
Please read my full post for additional recipe notes, tips, and serving suggestions!
Nutrition
Recipe Troubleshooting
For immediate help troubleshooting a recipe, please email me using the form on my contact page. I’ll try to respond to urgent questions as quickly as possible! For all general questions, please leave a comment here :)


Yes!!! So much better than store bought!
I love homemade breads and these look so yummy!
I am a huge English muffin guy, so I’ve got to give these a try!
You can’t beat a great english muffin!
These look SO perfect! I love how easy they are to make too!
My favorite thing for breakfast!
I’ve always wanted to try homemade English muffins Jennifer! My husband would love it if I made him a batch. They’re his favorite!
Way better than store bought! Love the junk free real version!
Breads are typically not my friend as I’m usually too impatient to allow the resting time. These would be perfect to have in the freezer or to use to make breakfast sandwiches for weekday mornings when things are hectic. And a sourdough version would be awesome! We are also pumpernickel fans so that would be a cool variation.
These look so perfect!!!
Cant wait to make these! Love how easy they are too!
oh, jen.
i made these last night and my husband i were devouring them with local butter in front of the fireplace.
they were divine and steamy when opened.
revisited them this morning, toasted, and they were so much fresher tasting than any store bought muffin.
thanks for all your hard work!
These are just brilliant!
Hi, may I know is there a recipe for sourdough english muffins? I have some sourdough starter. Would like to try on this. : )
Hi there! That’s a great question. I have some sourdough starter as well that I’ve been wanting to try with this recipe, but unfortunately I haven’t had a chance to try it yet, so I’m not sure how to adapt the recipe. I have a feeling it would work, but I’m not sure what amount of starter to use and how long to let it rise for. Sorry about that!
Would be helpful and illustrative if this recipe defined “lukewarm”. X degrees C/F?
Hi Kat! Lukewarm doesn’t have one standard temperature associated with it, so I tend to think of it as just warmer than my body temperature (stick a finger in the faucet before measuring out the water). That’s how I was trained in school. While a lot of things in cooking depend on exact temperatures (the oven, candy boil stages, etc), yeast will be ok as long as the water isn’t too hot or too cold.
Liquids added to yeast should not be more than 115 F