
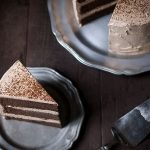
This Chocolate Espresso Layer Cake is one of the most popular cakes on my blog! Once you try it, you’ll know why. This chocolate espresso cake recipe is rich and flavorful, with just the right level of sweetness. The flavors compliment each other perfectly, and the meringue buttercream adds incredible lightness. Keep reading to learn how to make my chocolate espresso cake.

I love layer cakes but I have to admit they stress me out. There are so many all or nothing moments where there’s just no turning back. Getting the three layers of cake to be even and level.
Making sure the buttercream doesn’t break. Flipping layers of cake upon frosted layers of cake, hoping that each one sits just perfectly so that the sides are even. It makes my palms sweat.
No matter how many times I’ve made layer cakes, I still get nervous at these defining moments. I was so thrilled with the way this chocolate espresso layer cake turned out. I couldn’t have asked for better results.


I haven’t always been that lucky, though! I always procrastinate cutting that first slice. I’ve spent so much time with the frosting and everything looks so beautiful from the outside.
Will it look as good on the inside? Will the frosting layers be even? Will the slice pull neatly away from the cake so that I can get a picture of both together?
Will the center have an even point? Sometimes, when I’m lucky, it all comes together perfectly in the end. And when that happens, it feels like magic. This chocolate espresso layer cake was definitely one of those magical moments.

Update: I’m getting a lot of questions about how I got such a clean slice of cake. My method: use a long, sharp knife. Run it under hot water, wipe it dry and immediately cut one slice in a straight down, non-sawing motion.
Don’t pull the knife up, pull it straight out toward you. Then repeat the process for the other side, starting with the hot water. That’s how I do it!
Also, I use Valrhona cocoa powder (linked below under “Tools I Used”) which is a high quality cocoa powder used by most high end bakeries and restaurants. Using a standard grocery store cocoa powder will work perfectly well but the cake may be lighter in color).
Natural Vs. Dutch-Process Cocoa Powder
This recipe uses Dutch-process cocoa powder. Did you know that different types of cocoa powder can produce different results in your recipe? If you’d like to know more about this, check out my post Natural vs. Dutch-Process Cocoa Powder.
Want to learn more about layer cakes?
Check out my post on how to make a perfect layer cake!
Want to learn more about buttercream?
Don’t miss my post: What is buttercream + troubleshooting tips
Chocolate Espresso Layer Cake
Ingredients
Chocolate Espresso Cake:
- 10 1/2 ounces all-purpose flour
- 2 tablespoons espresso powder
- 2 teaspoons baking powder
- 1 1/2 teaspoons kosher salt
- 3 ounces Dutch-processed cocoa powder (9 tablespoons)
- 1 1/2 cups half-and-half (or 50% cream + 50% whole milk)
- 1/4 cup espresso vodka such as Van Gogh (regular espresso may be substituted)
- 1 1/2 tablespoons pure vanilla extract
- 9 ounces unsalted butter (room temperature)
- 21 ounces granulated sugar (2 1/4 cup)
- 6 large eggs (room temperature)
Chocolate Espresso Italian Meringue Buttercream:
- 13 ounces (1 1/2 cups) granulated sugar
- 1/4 cup + 2 tablespoons water
- Optional: 1 teaspoon corn syrup
- 5 large egg whites
- 16 ounces unsalted butter, cubed and at room temperature
- 3 ounces unsweetened chocolate (melted)
- 1 tablespoon espresso vodka such as Van Gogh, room temperature
- 1 tablespoon brewed espresso room temperature
Instructions
Prepare the cakes
- Preheat the oven to 350 degrees F. Place an oven rack in the middle position. Lightly spray the bottom of 3 8-inch cake pans with baking spray and then cover them with parchment rounds. Set aside.
- Whisk together the flour, espresso powder, baking powder and salt in a medium bowl. Sift in the cocoa powder and whisk until the dry ingredients are evenly combined. In a separate small bowl, combine the half and half, espresso vodka and vanilla extract.
- In a stand mixer with the paddle attachment, cream the butter and sugar together on low speed for 5 minutes. Add the eggs, one at a time, allowing each egg to incorporate before adding the next. Scrape down the sides of the bowl. With the mixer still on low speed, swiftly alternate between adding the dry and liquid ingredients over the course of a minute. Scrape down the sides well, making sure to reach the bottom of the bowl. Turn the mixer on medium speed for 30 seconds.
- Distribute the batter evenly between the 3 prepared cake pans, using a spatula to even out the tops.
- Bake until the a toothpick comes out of the center of each cake clean, approximately 30-35 minutes. Allow the cakes to cool completely in the pan before removing.
Prepare the frosting
- Add sugar, water and corn syrup to a medium sized sauce pot. Cover and turn the heat to high. Once the liquid begins to simmer and steam has developed, remove the cover (this helps prevent crystallization). Using a candy thermometer, cook the sugar to the soft boil stage, 235-240 degrees F.
- While the sugar is cooking, whisk the eggs on high in a stand mixer with the whisk attachment until a soft peak has formed.
- Turn the mixer speed down to medium low and very slowly pour the syrup down the side of the bowl into the egg whites. Don’t pour the hot syrup directly into the meringue.
- Once the syrup is completely incorporated, turn the speed to high and allow the meringue to continue to form a stiff peak while cooling down. Mix on high until the meringue has reached room temperature. To speed up this 15-20 minute process, ice packs can be placed around the bowl.
- Once the meringue is room temperature, slowly begin incorporating the soft butter on medium speed. Once all of the butter has been incorporated, turn the mixer speed up to high and very slowly add the chocolate, espresso and vodka.
Assemble the cake
- Place the first layer of cake on a revolving cake stand and remove the parchment paper. Placing a cardboard round below the cake is optional but will make transporting the cake easier after it is assembled.
- Spread approximately one cup of buttercream on the cake and spread it around evenly with an offset spatula. Add more buttercream as needed to reached the desired thickness. Repeat with the second and third layer (don't forget to remove the parchment each time). Use an offset spatula to apply a thin layer of frosting to the side and top of the cake. Chill in the refrigerator for 30 minutes to set this first layer of buttercream. Cover the entire cake with a final layer of frosting. Grate some unsweetened or semi-sweet chocolate on top of the cake for decoration, if desired.
- Cake is best when served at room temperature.
Notes
Please read my full post for additional recipe notes, tips, and serving suggestions!
Nutrition
Recipe Troubleshooting
For immediate help troubleshooting a recipe, please email me using the form on my contact page. I’ll try to respond to urgent questions as quickly as possible! For all general questions, please leave a comment here :)
Tools I used:
(these links go to my Amazon affiliate store)
Ateco Revolving Cake Stand
EatSmart Precision Pro Digital Kitchen Scale
KitchenAid Stand Mixer
Parchment Sheets
Wilton Cake Rounds
Wilton Cake and Cookie Lifter
Digital Thermometer
Offset Spatula
Valrhona Cocoa Powder


Jennifer, honest to god, this is the most gorgeous cake I’ve ever seen made by a blogger! It is FLAWLESS. Beautiful job on this. I bet it tastes even better than it looks!
Is there a substitute for the vodka? I don’t have any on hand.
I would try swapping the vodka out with fresh brewed espresso (cool it to room temperature).
You had me at Espresso. I personally am not the biggest chocolate cake fan but I love espresso and the vodka espresso really piqued my interest. Boozy cakes are always fun and met with anticipation around my kitchen. Your photos are beautiful and I wanted to make this. Wow oh wow! This is a showpiece cake! It was absolutely delicious and sliced up perfectly. I’ve had nothing but rave reviews and will make this again and agin for very special occasions. My batter was not the dark color but beautiful nonetheless and perfect in every way. I wonder if you used dark cocoa maybe?
I used Valrhona cocoa powder which is very rich, much more so than the cocoa powder you’ll find at the grocery store. A lot of restaurants use it to get super intense chocolate flavor but it’s harder to come by in stores (specialty shops might carry it). I ordered mine online.
I saw your gorgeous cake a few days ago and pulled it up again just now as I’m getting ready to assemble and frost a chocolate cake this morning! I scrolled through the comments so I’ve already found the answer to my question about how you achieved such a perfect slice (answered 4 or 5 times!) – I definitely think a little how-to post would be awesome! :-)
I just might! In the end, slow and meticulous really makes the difference. I make sure every layer is even and flat. I try to evenly portion out the frosting. I’m slow with frosting the outside and making sure the sides and top are level. And then, yes, the slice has to look good :)
Jen,
Your photography is simply wonderful. This post, words and photos, was a visual feast.
Thanks–now I’m going to walk the dog down to the store for something sweet, as I’ve got a hankering!
Kirsten- As always, thank you so much for the kind words! You are so sweet and I appreciate all of the support!
Wow, it’s so cool to hear you talk about how you love taking photos of chocolate. I was just whinging last night about how hard it was to make a chocolate ganache look good… “It’s too brown!”. I think I need to double check my lighting and backdrop, then give it another go. During the DAYTIME, so as to get rid of artificial lighting :)
Love the look of this cake. Your simple food styling does it so much justice… those perfect layers just shine wonderfully! Definitely giving this a go, soon.
oh my, this cake is absolutely divine :) such beautiful photos!
Yummmy! This looks fascinating and delicious and I could go on!
I just wanna ask you is there a substitute for the alcohol? Or can I totally onmit it without ruining the cake?
Thanks so much for your help! I hope to see and try more recipes from u website
Hi Judi! I would use fresh brewed, room temperature espresso as a substitute.
I’m making this cake today for my daughter, she’s moving to Cali, we live in MA :(:(:( So I want it to come out perfect. The cake doesnt scare me. It’s the frosting!!!! Frosting always makes me so nervous! Ugghhhh What if is is yucky?? It will ruin the entire cake!! Maybe you can come over and help :)
I won’t lie, Italian meringue buttercream can be tricky and I’ve screwed it up before. It might be best for you to just use a buttercream recipe like the alternate version I linked at the bottom of the recipe. Why worry about it when you don’t have to?
I’ve been wanting to try my hand at an Italian meringue buttercream and this cake sounds divine! Yours is absolutely gorgeous!
I know I’ve already commented on this one but had to ask, where does one find espresso vodka? at the grocery store or online? This cake is seriously perfection.
You should be able to find it at any liquor store
This cake looks so delicious! it definitely warrants being pinned to make for a special occasion.
This cake looks AMAZING! I would eat the whole thing!
Hi. I made this cake today after spotting it a while back. My cake didn’t turn out that lovely rich brown but still tastes very good. It also took 45 minute to bake. My Italian buttercream turned out AMAZING (first ever attempt).
Thank you for sharing such a beauty. I enjoyed the challenge today and appreciate the challenge you clever bakers face you truly are an artist and master.
Hi rachel! I’m so glad you liked it. What type of cocoa powder are you using? You’re the second person to mention this so I think I need to add a disclaimer. I use Valrhona which is very rich with a high cocoa fat. I didn’t realize it would impact the color of the cake. This is the good quality cocoa powder that most restaurants and bakeries use.
I used E. Guittard Cocoa Rouge (Red Dutch Process Cocoa – picked it up at Sur la table). Still tastes great. I now have an 8 inch layer cake sitting in my fridge and knowing how many eggs and butter went into this masterpiece I need to call some friends over quickly to consume it all! Thanks again, I look forward to trying more of your recipes :-)
This cake is so gorgeous and combines two of my all time favourite flavours but I CANNOT get over how perfect and sharp that slice is! How do you do it? I am always sliding sideways somehow.
Hi Julia,
Scroll to just under the recipe and you’ll see a section where I explain how I get my slices :)
-Jen
Thank you, Jen. I can’t believe I missed it. I read it and practiced “air-cutting” now let’s hope it will work once I make a real cake. Thank you for leaving a lovely comment on my site!