
This Chocolate Espresso Layer Cake is one of the most popular cakes on my blog! Once you try it, you’ll know why. This chocolate espresso cake recipe is rich and flavorful, with just the right level of sweetness. The flavors compliment each other perfectly, and the meringue buttercream adds incredible lightness. Keep reading to learn how to make my chocolate espresso cake.

I love layer cakes but I have to admit they stress me out. There are so many all or nothing moments where there’s just no turning back. Getting the three layers of cake to be even and level.
Making sure the buttercream doesn’t break. Flipping layers of cake upon frosted layers of cake, hoping that each one sits just perfectly so that the sides are even. It makes my palms sweat.
No matter how many times I’ve made layer cakes, I still get nervous at these defining moments. I was so thrilled with the way this chocolate espresso layer cake turned out. I couldn’t have asked for better results.


I haven’t always been that lucky, though! I always procrastinate cutting that first slice. I’ve spent so much time with the frosting and everything looks so beautiful from the outside.
Will it look as good on the inside? Will the frosting layers be even? Will the slice pull neatly away from the cake so that I can get a picture of both together?
Will the center have an even point? Sometimes, when I’m lucky, it all comes together perfectly in the end. And when that happens, it feels like magic. This chocolate espresso layer cake was definitely one of those magical moments.

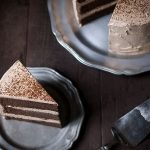
Update: I’m getting a lot of questions about how I got such a clean slice of cake. My method: use a long, sharp knife. Run it under hot water, wipe it dry and immediately cut one slice in a straight down, non-sawing motion.
Don’t pull the knife up, pull it straight out toward you. Then repeat the process for the other side, starting with the hot water. That’s how I do it!
Also, I use Valrhona cocoa powder (linked below under “Tools I Used”) which is a high quality cocoa powder used by most high end bakeries and restaurants. Using a standard grocery store cocoa powder will work perfectly well but the cake may be lighter in color).
Natural Vs. Dutch-Process Cocoa Powder
This recipe uses Dutch-process cocoa powder. Did you know that different types of cocoa powder can produce different results in your recipe? If you’d like to know more about this, check out my post Natural vs. Dutch-Process Cocoa Powder.
Want to learn more about layer cakes?
Check out my post on how to make a perfect layer cake!
Want to learn more about buttercream?
Don’t miss my post: What is buttercream + troubleshooting tips
Chocolate Espresso Layer Cake
Ingredients
Chocolate Espresso Cake:
- 10 1/2 ounces all-purpose flour
- 2 tablespoons espresso powder
- 2 teaspoons baking powder
- 1 1/2 teaspoons kosher salt
- 3 ounces Dutch-processed cocoa powder (9 tablespoons)
- 1 1/2 cups half-and-half (or 50% cream + 50% whole milk)
- 1/4 cup espresso vodka such as Van Gogh (regular espresso may be substituted)
- 1 1/2 tablespoons pure vanilla extract
- 9 ounces unsalted butter (room temperature)
- 21 ounces granulated sugar (2 1/4 cup)
- 6 large eggs (room temperature)
Chocolate Espresso Italian Meringue Buttercream:
- 13 ounces (1 1/2 cups) granulated sugar
- 1/4 cup + 2 tablespoons water
- Optional: 1 teaspoon corn syrup
- 5 large egg whites
- 16 ounces unsalted butter, cubed and at room temperature
- 3 ounces unsweetened chocolate (melted)
- 1 tablespoon espresso vodka such as Van Gogh, room temperature
- 1 tablespoon brewed espresso room temperature
Instructions
Prepare the cakes
- Preheat the oven to 350 degrees F. Place an oven rack in the middle position. Lightly spray the bottom of 3 8-inch cake pans with baking spray and then cover them with parchment rounds. Set aside.
- Whisk together the flour, espresso powder, baking powder and salt in a medium bowl. Sift in the cocoa powder and whisk until the dry ingredients are evenly combined. In a separate small bowl, combine the half and half, espresso vodka and vanilla extract.
- In a stand mixer with the paddle attachment, cream the butter and sugar together on low speed for 5 minutes. Add the eggs, one at a time, allowing each egg to incorporate before adding the next. Scrape down the sides of the bowl. With the mixer still on low speed, swiftly alternate between adding the dry and liquid ingredients over the course of a minute. Scrape down the sides well, making sure to reach the bottom of the bowl. Turn the mixer on medium speed for 30 seconds.
- Distribute the batter evenly between the 3 prepared cake pans, using a spatula to even out the tops.
- Bake until the a toothpick comes out of the center of each cake clean, approximately 30-35 minutes. Allow the cakes to cool completely in the pan before removing.
Prepare the frosting
- Add sugar, water and corn syrup to a medium sized sauce pot. Cover and turn the heat to high. Once the liquid begins to simmer and steam has developed, remove the cover (this helps prevent crystallization). Using a candy thermometer, cook the sugar to the soft boil stage, 235-240 degrees F.
- While the sugar is cooking, whisk the eggs on high in a stand mixer with the whisk attachment until a soft peak has formed.
- Turn the mixer speed down to medium low and very slowly pour the syrup down the side of the bowl into the egg whites. Don’t pour the hot syrup directly into the meringue.
- Once the syrup is completely incorporated, turn the speed to high and allow the meringue to continue to form a stiff peak while cooling down. Mix on high until the meringue has reached room temperature. To speed up this 15-20 minute process, ice packs can be placed around the bowl.
- Once the meringue is room temperature, slowly begin incorporating the soft butter on medium speed. Once all of the butter has been incorporated, turn the mixer speed up to high and very slowly add the chocolate, espresso and vodka.
Assemble the cake
- Place the first layer of cake on a revolving cake stand and remove the parchment paper. Placing a cardboard round below the cake is optional but will make transporting the cake easier after it is assembled.
- Spread approximately one cup of buttercream on the cake and spread it around evenly with an offset spatula. Add more buttercream as needed to reached the desired thickness. Repeat with the second and third layer (don't forget to remove the parchment each time). Use an offset spatula to apply a thin layer of frosting to the side and top of the cake. Chill in the refrigerator for 30 minutes to set this first layer of buttercream. Cover the entire cake with a final layer of frosting. Grate some unsweetened or semi-sweet chocolate on top of the cake for decoration, if desired.
- Cake is best when served at room temperature.
Notes
Please read my full post for additional recipe notes, tips, and serving suggestions!
Nutrition
Recipe Troubleshooting
For immediate help troubleshooting a recipe, please email me using the form on my contact page. I’ll try to respond to urgent questions as quickly as possible! For all general questions, please leave a comment here :)
Tools I used:
(these links go to my Amazon affiliate store)
Ateco Revolving Cake Stand
EatSmart Precision Pro Digital Kitchen Scale
KitchenAid Stand Mixer
Parchment Sheets
Wilton Cake Rounds
Wilton Cake and Cookie Lifter
Digital Thermometer
Offset Spatula
Valrhona Cocoa Powder


This cake is STUNNING, Jen! I know just what you mean about having sweaty palms when making a cake — I always feel that way when I make one. And yet, even if it doesn’t turn out perfectly, it still tastes delicious. :) This one, however, is both!
Thanks so much , Stephanie! I’m thinking about making cakes more often so it’s not such an ordeal. I don’t think there’s anything more satisfying as a baker than a beautiful layer cake.
This truly is a magical cake!! It is stunning and I only wish I could make one half a beautiful as this!! Please come teach me how it is done?! This is just stunning and every layer is perfect, not to mention the flavors going one here! INCREDIBLE!!
I want that perfect slice!
Aww, thanks Tieghan. I have absolutely no doubt you could make a cake this beautiful. Feel free to shoot me any email anytime if you have questions :)
If a cake can be breathtaking, this is it.
Thanks Amy :)
WOW !!! That cake IS perfect! Great job on the photography too!
I completely understand about the nerve wracking business of making layer cakes. But they are still my favorite to make. One thing I do to ensure even layers is to measure the batter as I fill the pans. It’s more time consuming but well worth it if you are aiming for perfection. I also always use those magic strip thingy’s they really help to keep the top even and never domed. The frosting is where I start to sweat bullets! The entire ordeal of frosting makes me tremble!
Keep on making layer cakes so I can! :)
I used to measure each pan on the scale but have gotten pretty good at eying it. What’s the magic strip? Is that the saw with 2 handles? I have one of those but find it flimsy so I usually use a serrated knife if I need to remove a domed top.
They are cloth like bands that wrap around the outside of the cake pans and held on with clips. though I have seen them made with velcro but haven’t tried them yet. They work wonderfully. No change to the texture or the flavor of the cake and every single time I have used them (which is all the time) my cakes are beautifully flat on top.
I got mine at Wilton and there they are called Bake-Even Strips.
Good luck and keep on baking! :)
What a beauty! You had me at chocolate espresso.
Such a good combo, isn’t it?
This is STUNNING. Absolutely perfect. I’m in awe — hope to one day make a cake half as beautiful as this. Thank you so much for sharing.
Thank you very much! I have no doubt you can pull it off.
Just gorgeous, Jennifer! I can totally relate to the anxiety of the all or nothing moments! I made a layer cake yesterday & asked my husband to level one of the cakes because I was so nervous about messing it up – LOL! I’m saving this recipe for my sister-in-law’s birthday in November! Thanks for the inspiration!
Thank you, let me know how it turns out!
This cake looks like it could seriously be the best chocolate cake I have ever had! Worth a shot ;)
Thank you very much, Jocelyn!
I might just have to step out of my 2-chocolate-cake-recipes rut and make this one! For the frosting, do you melt the (solid?) chocolate and combine with the espresso and vodka? I don’t think I’ve ever had buttercream with spirits before!
I add the liquids one at a time. I almost included this note- I find the easiest way to melt the chocolate is in the microwave. 15-25 seconds at a time, stirring in between. Once it’s melted, stick it in the fridge or freezer for a bit until it’s room temperature.
Jennifer this is your most beautiful cake to date I think! It’s just stunning. The layers, and the PRECISION. It’s a work of (cake) art! Pinned! I would love a slice!
Thank you, Averie, that means SO much coming from you! :)
I’m so in love with the first shot, Jen! You did such an amazing job with this challenge and you totally nailed it. Love the styling, the light, the cake itself… beautiful and delicious cake that I’ll never forget. :)
Thanks, Nami! I’m pretty proud of this one.
OMG Looks so sinfully good! It looks like it would send any chocolate/espresso lover to heaven. I can just imagine how moist and chocolaty it tastes. Looks beautiful!
Thanks, Kim!
Gorgeous photographs! And a delicious looking cake :)
Thank you!
This cake is totally beautiful!
Thank you, Kathryn :)
This is cake perfection! I find I don’t stress out as much about layer cakes as I used to, because I have learned that though I CARE about how it looks, it would seem that my guests just want to rip into it. I made what I thought was an absolutely gorgeous chocolate cake for a dinner party a couple of weeks ago. The icing was perfection. I piped a perfect border. Cocoa nibs were used as garnish. I’d be willing to bet that not a single one of the seven guests could tell you what that cake looked like. {sigh} But they sure looked happy…
I know no one else cares as much as I do but I always feel like a failure when it’s not even. I’m too much of a perfectionist. I love the idea of cocoa nibs for garnish!